Overview of Azure Logic Apps
Azure Logic Apps is a versatile, serverless platform for building automated enterprise-level workflows, offering extensive integration options beyond Microsoft 365. It’s more robust and scalable than Power Automate, suited for complex, large-scale integrations across various systems and services.
Creating Recurring Out-of-Office Messages in Outlook with Azure Logic Apps
As an administrator, setting up recurring out-of-office messages for users in Outlook can streamline many repetitive tasks. This guide will walk you through using Azure Logic Apps to automate this process. If you only need to set up out-of-office messages for yourself, see this guide instead.
Step 1: Creating Your Logic App
Begin by setting up a new Logic App within the Azure portal to manage your automated tasks.
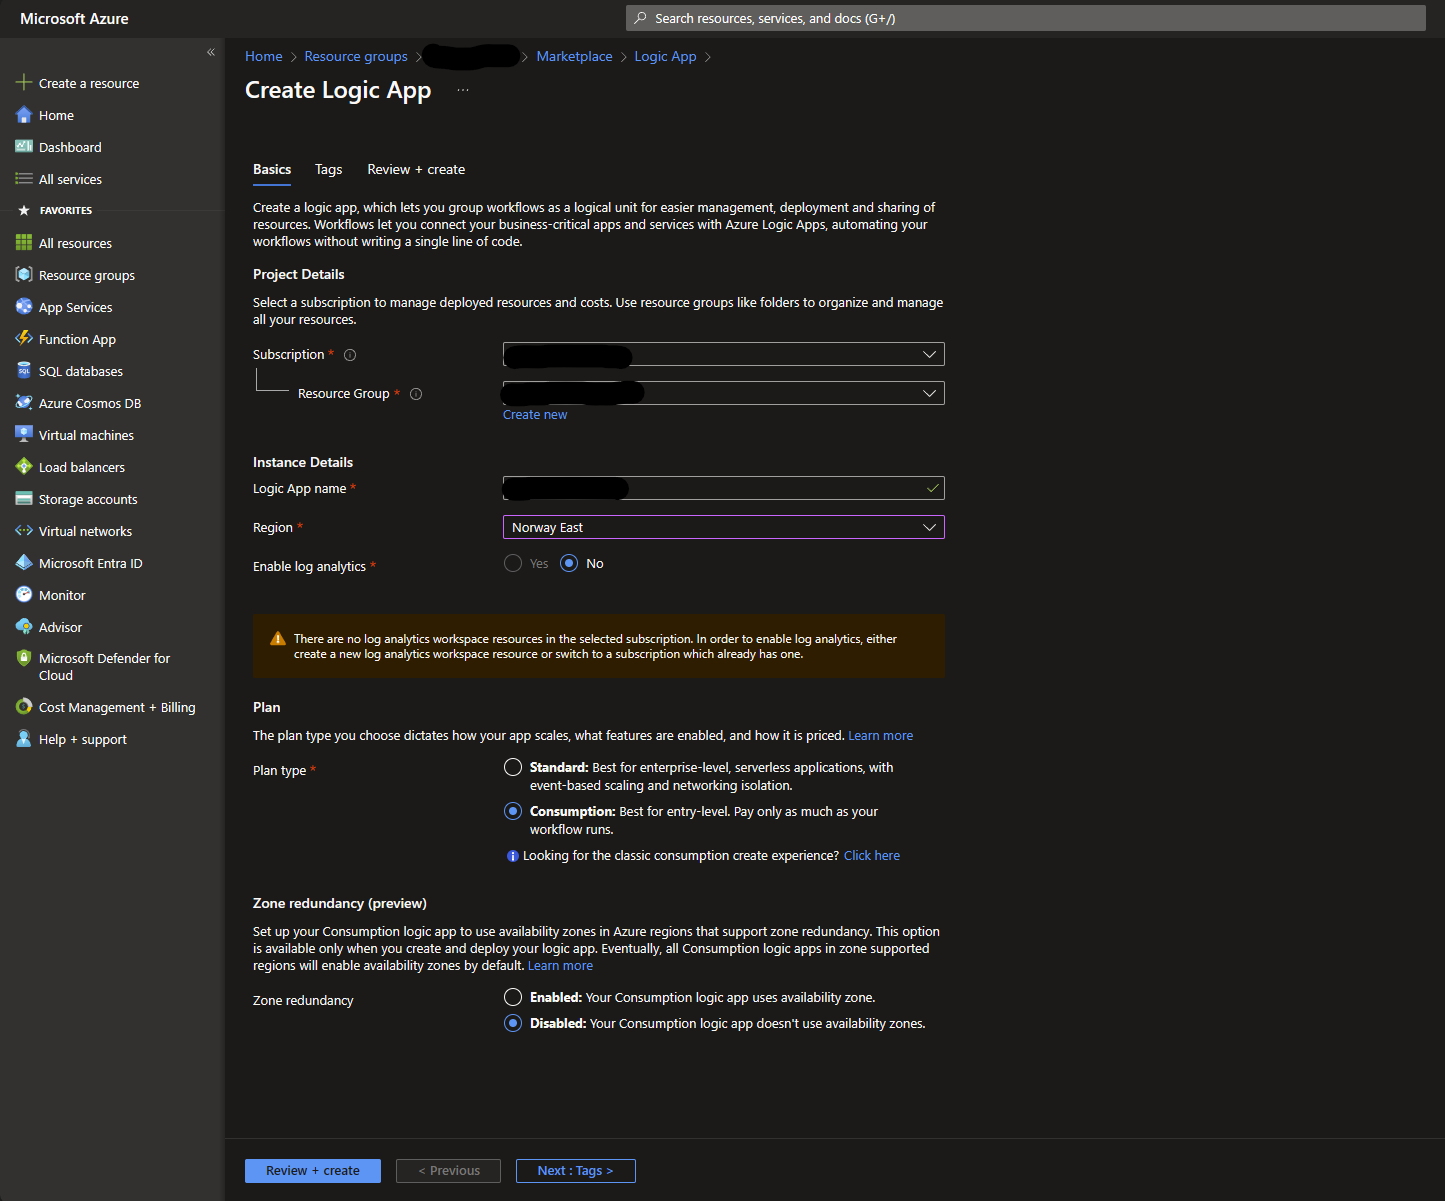
- In the Azure portal , go to the “Create a resource” section and select “Logic App”.
- Choose your Subscription and select or create a new Resource Group
- Give your Logic App a descriptive name and location
- For “Plan”, select “Consumption” as it is best suited for running small tasks like this
After configuring these settings, click “Review + create” to finalize your Logic App creation process.
Step 2: Enable System-Assigned Identity for Your Logic App
We need to enable a system-assigned identity for your Logic App to grant it the necessary permissions to access and modify user mailbox settings.
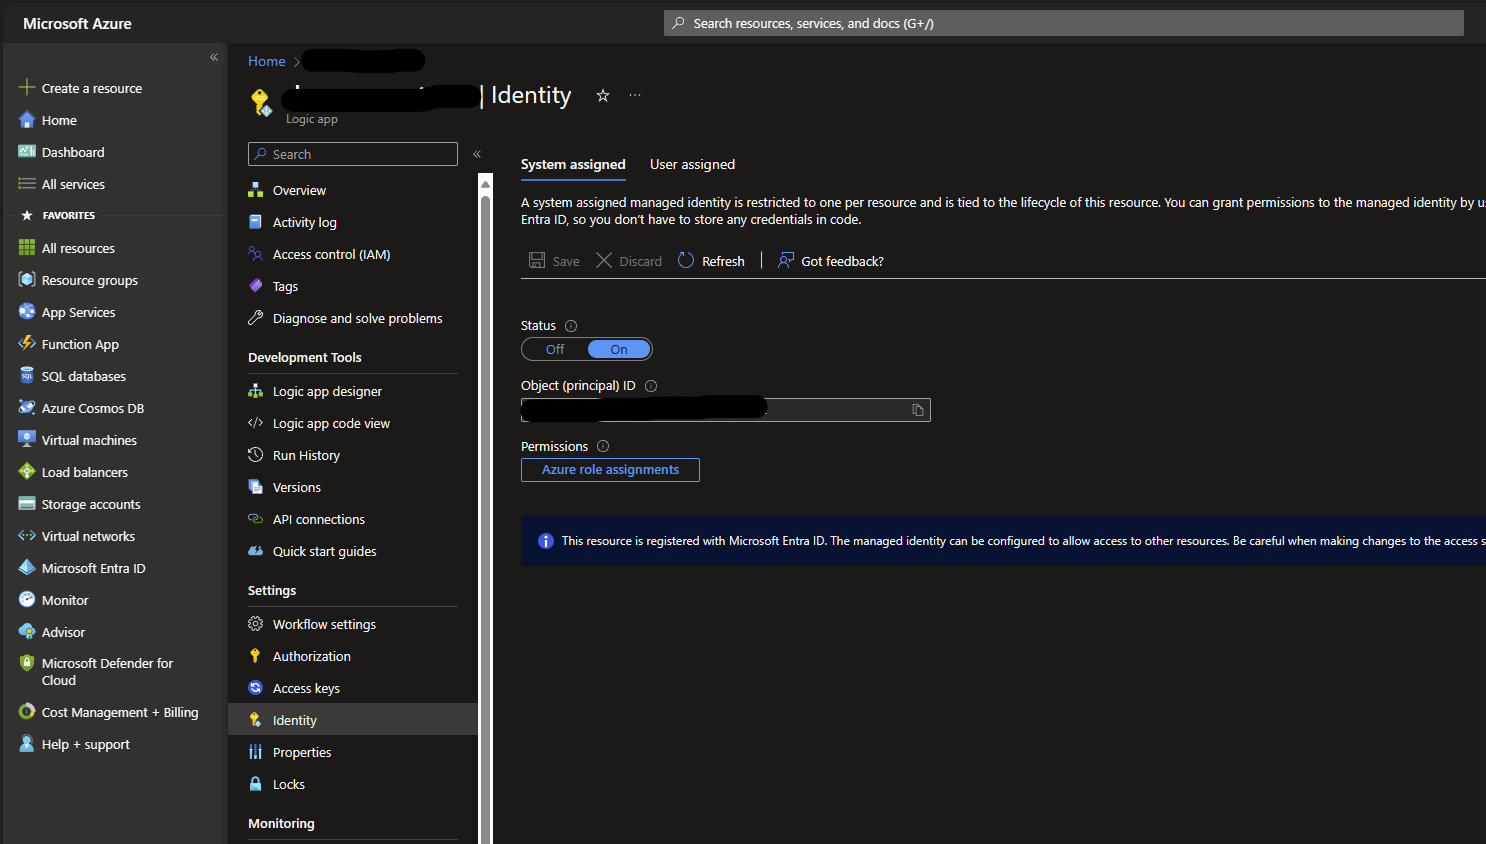
- Navigate to your Logic App resource in the Azure portal.
- In the Logic App menu under “Settings”, select “Identity”.
- In the “System assigned” tab, switch the “Status” to “On”. Azure will then create a system-assigned identity.
- Copy the “Object ID” value from the “Overview” tab. You’ll need this for the next step.
Step 3: Grant Necessary Permissions via Microsoft Graph PowerShell
The following PowerShell script will assign the MailboxSettings.ReadWrite permission to your Logic App’s managed identity:
| |
Explanation of the script steps:
- Install Microsoft Graph Module: Installs the Microsoft Graph PowerShell module, if not already installed.
- Connect to Microsoft Graph: Authenticates to Microsoft Graph. You’ll be prompted to sign in. Ensure you sign in with an account that has sufficient permissions.
- Set Logic App’s Object ID: Set the
$logicAppObjectIdvariable with your Logic App’s service principal Object ID (which you should have from a previous step). - Retrieve Microsoft Graph Service Principal: Fetches the Microsoft Graph service principal which contains the list of available permissions.
- Identify the Required Permission: Filters the available app roles to find the ID for the
MailboxSettings.ReadWritepermission. - Assign Permission: Creates a new app role assignment for the Logic App’s service principal, granting it the
MailboxSettings.ReadWritepermission.
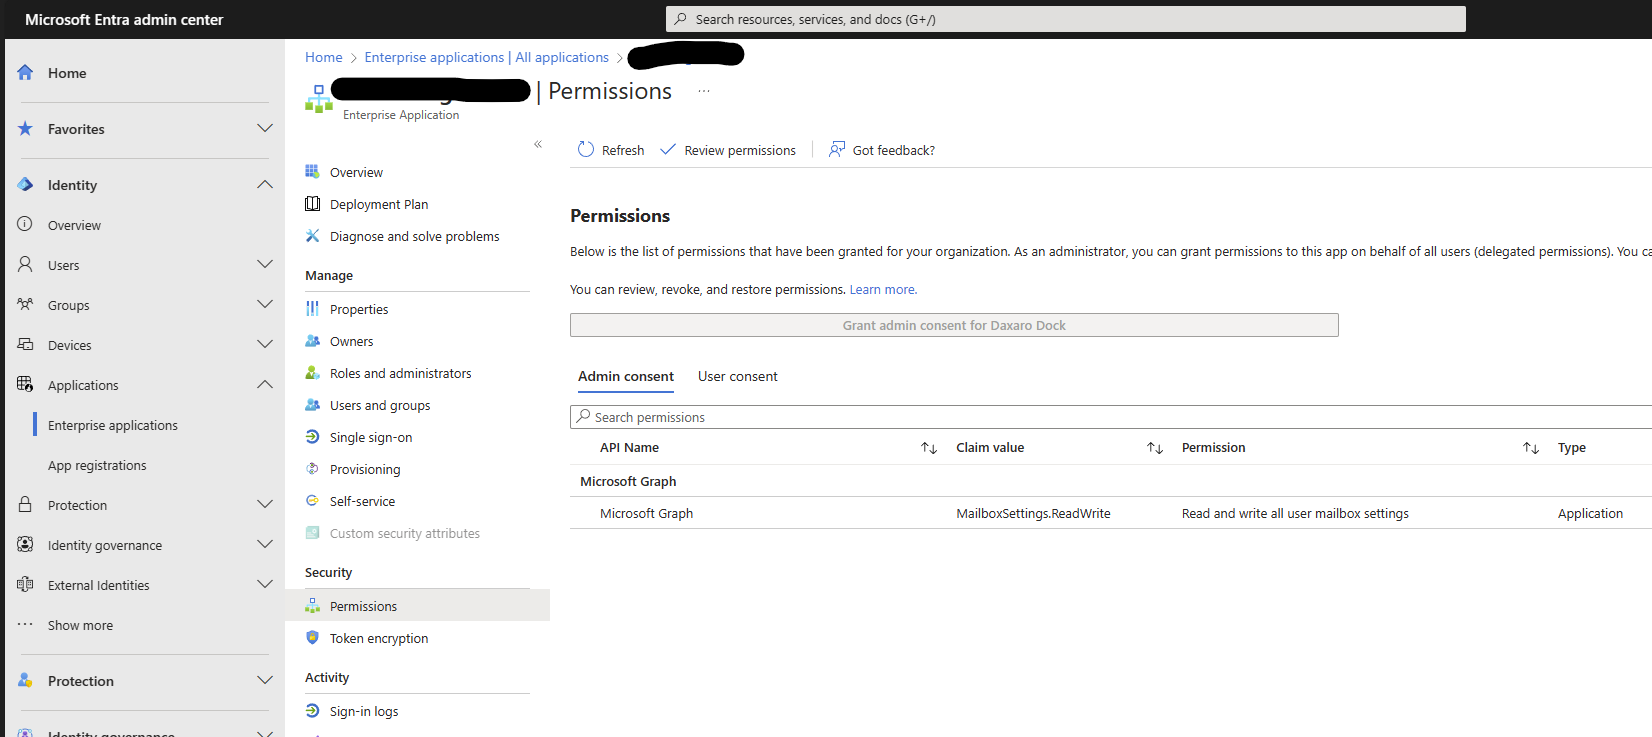
After running these steps, your Logic App will have the necessary permissions to access and modify user mailbox settings. You can confirm this by navigating to the Enterprise Applications section in the Azure portal and selecting the app with the same name as your Logic App. If you can’t find it, change “Application type” to “Managed Identity”. Under “Permissions”, you should see the MailboxSettings.ReadWrite permission.
Step 4: Create a New Logic App Workflow
Step 4.1: Adding a Recurrence Trigger
To begin automating the out-of-office message, we first need to define when this action should take place. In this guide, we’ll set up a trigger that activates every Thursday, as we have a user who has every Friday off.
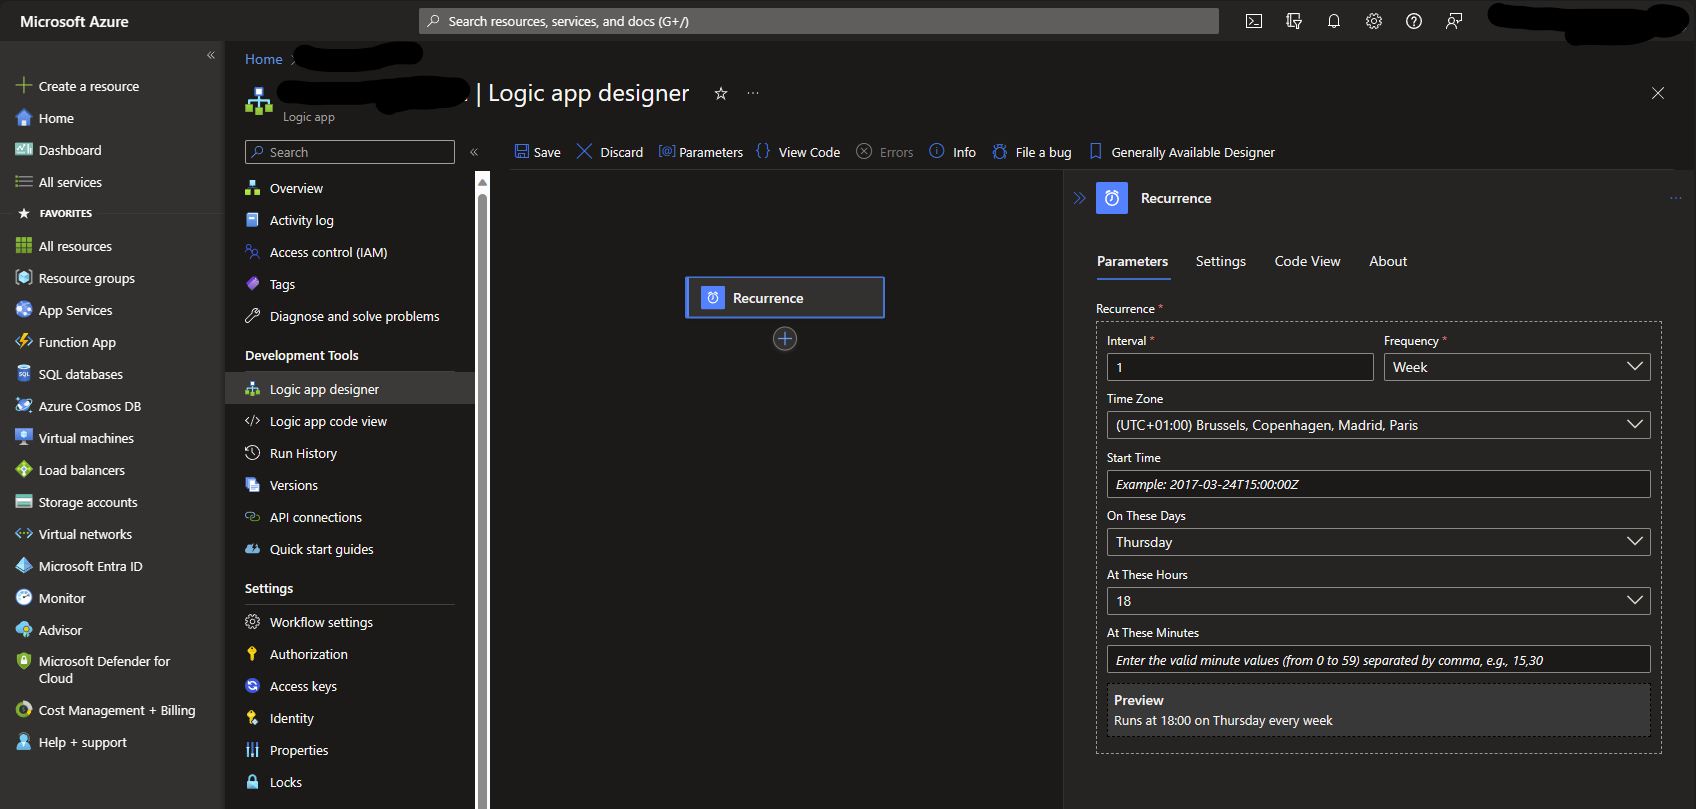
- In the Logic App Designer, add a new trigger by selecting the “Recurrence” action.
- Configure the trigger with the following settings:
- Frequency: Set to “Week” to indicate a weekly recurrence.
- Interval: Set to
1to indicate that the action should happen once every week. - Time Zone: Choose the appropriate time zone, for example “(UTC-01:00) Brussels, Copenhagen, Madrid, Paris”.
- Start Time: Leave this blank to indicate that the action should start immediately.
- On These Days: Select the days of the week when the action should trigger, such as “Thursday”.
- At These Hours and Minutes: Set the desired hour and minute for the action to trigger, such as
18for the hour if you want the out-of-office to start at 6 PM.
The configuration will ensure that the out-of-office message is added every Thursday evening, right before the user’s day off.
Step 4.2: Setting the Out-of-Office Message via Microsoft Graph API (HTTP Request)
Next, we’ll add an action to set the out-of-office message for the user. We’ll use the Microsoft Graph API to do this.
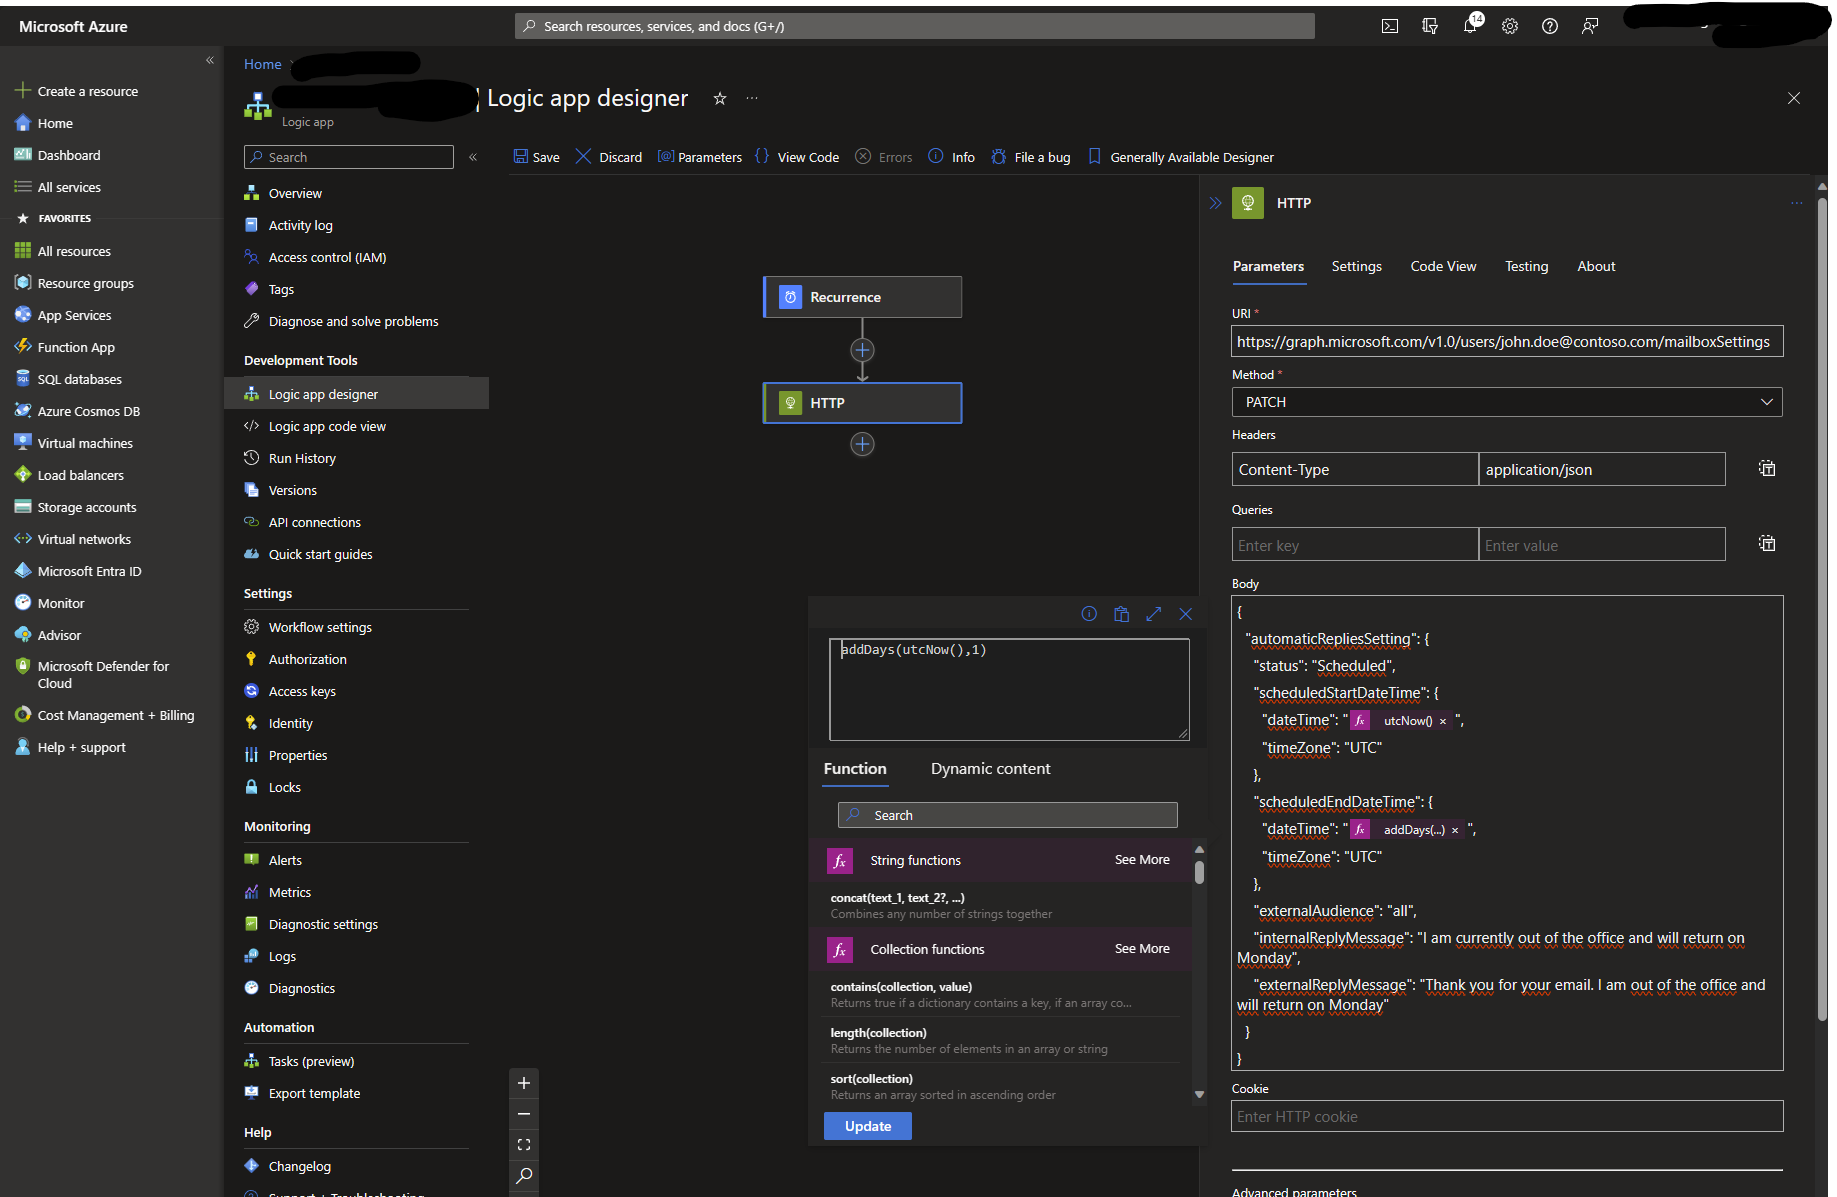
- Add a new action by selecting “New step” and then “Add an action”.
- Search for “HTTP” and select the “HTTP” action.
- Configure the action with the following settings:
- Method: Set to
PATCHto indicate that we want to update an existing resource. - URI: Set to
https://graph.microsoft.com/v1.0/users/{id | userPrincipalName}/mailboxSettingswhere{id | userPrincipalName}is the user’s ID or user principal name (UPN). - Headers: Add a new header with the following settings:
- Name: Set to
Content-Type. - Value: Set to
application/json.
- Name: Set to
- Body: Set to the following JSON, replace dateTime with dynamic expressions
utcNow()andaddDays(utcNow(), 1)to add the current date and the current date plus one day, respectively:
 1
 2
 3
 4
 5
 6
 7
 8
 9
10
11
12
13
14
15
16
{ "automaticRepliesSetting": { "status": "Scheduled", "scheduledStartDateTime": { "dateTime": "@{utcNow()}", "timeZone": "UTC" }, "scheduledEndDateTime": { "dateTime": "@{addDays(utcNow())}", "timeZone": "UTC" }, "externalAudience": "all", "internalReplyMessage": "I am currently out of the office and will return on Monday", "externalReplyMessage": "Thank you for your email. I am out of the office and will return on Monday" } } - Method: Set to
- Show Advanced parameters and set the following settings:
- Authentication Type: Set to “Managed Identity” to indicate that we want to use the Logic App’s managed identity to authenticate with Microsoft Graph
- Managed Identity: Set to “System-assigned managed identity”
- Audience: Set to
https://graph.microsoft.com
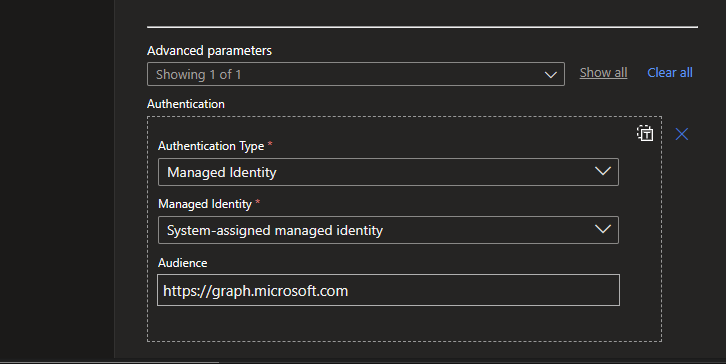
The configuration will ensure that the out-of-office message is set for the user, with the start date being the current date and the end date being the current date plus one day. You may use \n to add line breaks in the internal and external reply messages.
Note! Scheduled out-of-office is not visible in the Admin Center. You can verify that the out-of-office message is set correctly by using the Get Mailbox Settings endpoint in Microsoft Graph.
Remember to save your Logic App.
Optional: Error Handling
Optionally, we’ll add an action to handle any errors that may occur during the process.
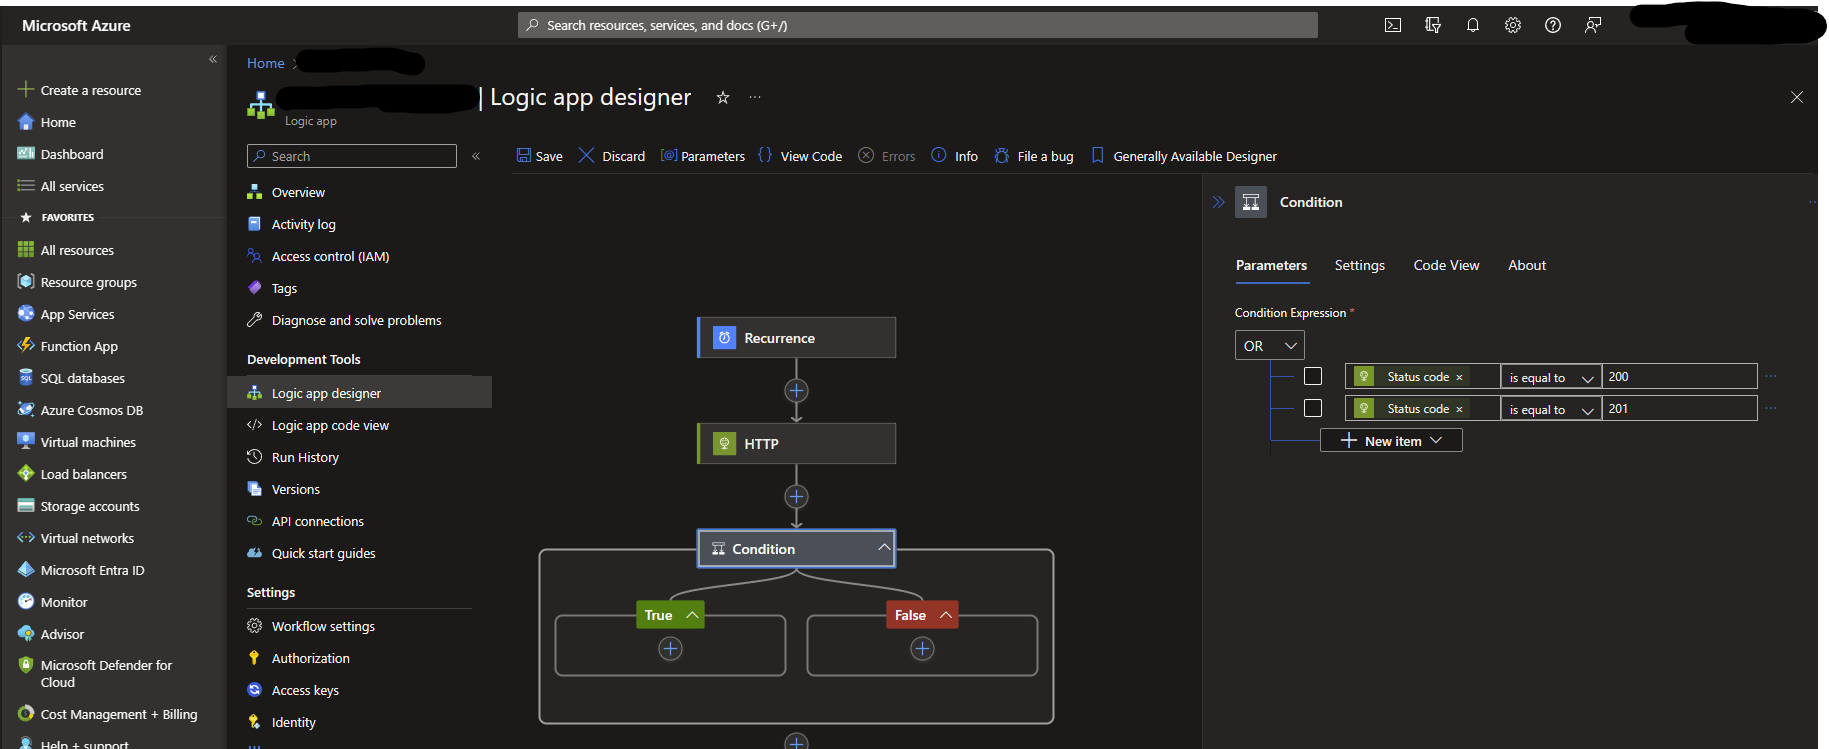
- Add a new action by selecting “New step” and then “Add an action”.
- Search for “Condition” and select the “Condition” action.
- Configure the action with the following settings:
- Condition Expression: Set to
OR - Choose a value: Select Dynamic content and search for
Status Code. - Choose a condition: Set to
is equal to. - Choose a second value: Set to
200. - Add a secont row: Repeat for Status Code
201.
- Condition Expression: Set to
You can add actions to send an email or a notification to yourself if the condition is met. This will ensure that you’re notified if the out-of-office message isn’t set correctly.
Optional: Skip if Out-of-Office is Already Set
Optionally, we’ll add an action to skip the process if the out-of-office message is already set for the user.
- Add a new action by selecting “New step” and then “Add an action”.
- Search for “HTTP” and select the “HTTP” action.
- Configure the action with the following settings:
- Method: Set to
GETto indicate that we want to retrieve an existing resource. - URI: Set to
https://graph.microsoft.com/v1.0/users/{id | userPrincipalName}/mailboxSettingswhere{id | userPrincipalName}is the same user’s ID or user principal name (UPN).
- Method: Set to
- Show Advanced parameters and set the following settings:
- Authentication Type: Set to “Managed Identity”
- Managed Identity: Set to “System-assigned managed identity”
- Audience: Set to
https://graph.microsoft.com
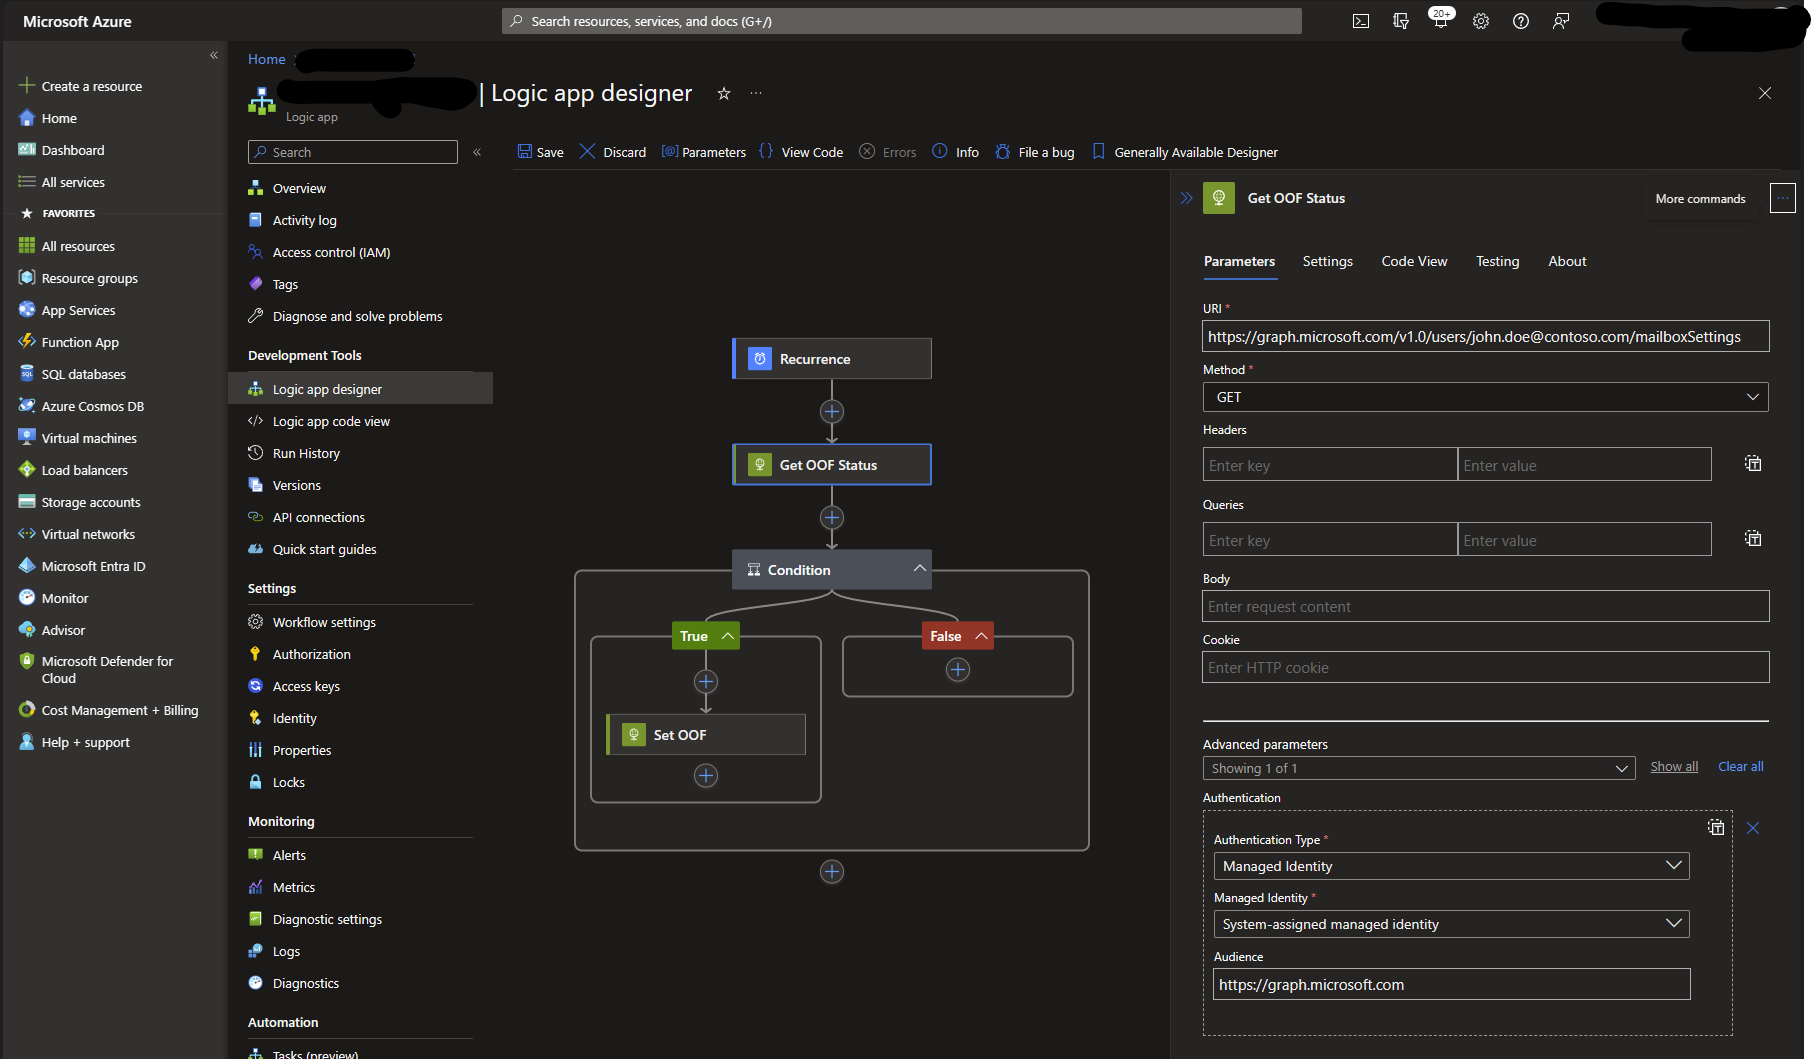
- Add a new action by selecting “New step” and then “Add an action”.
- Search for “Condition” and select the “Condition” action.
- Configure the action with these two rows:
- Condition Expression: Set to
OR - Choose a value: Select Expression and in Dynamic Content, add:
body('Get OOF Status')?['automaticRepliesSetting']?['scheduledEndDateTime']?['dateTime']. ReplaceGet OOF Statuswith the name of the previous action. - Choose a condition: Set to
is less than. - Choose a second value: Set to Expression
utcNow(). - Add a second row: Select Expression and in Dynamic Content, add:
body('Get OOF Status')?['automaticRepliesSetting']?['status']. Again, replaceGet OOF Statuswith the name of the previous action. - Choose a condition: Set to
is equal to. - Choose a second value: Set to
Disabled.
- Condition Expression: Set to
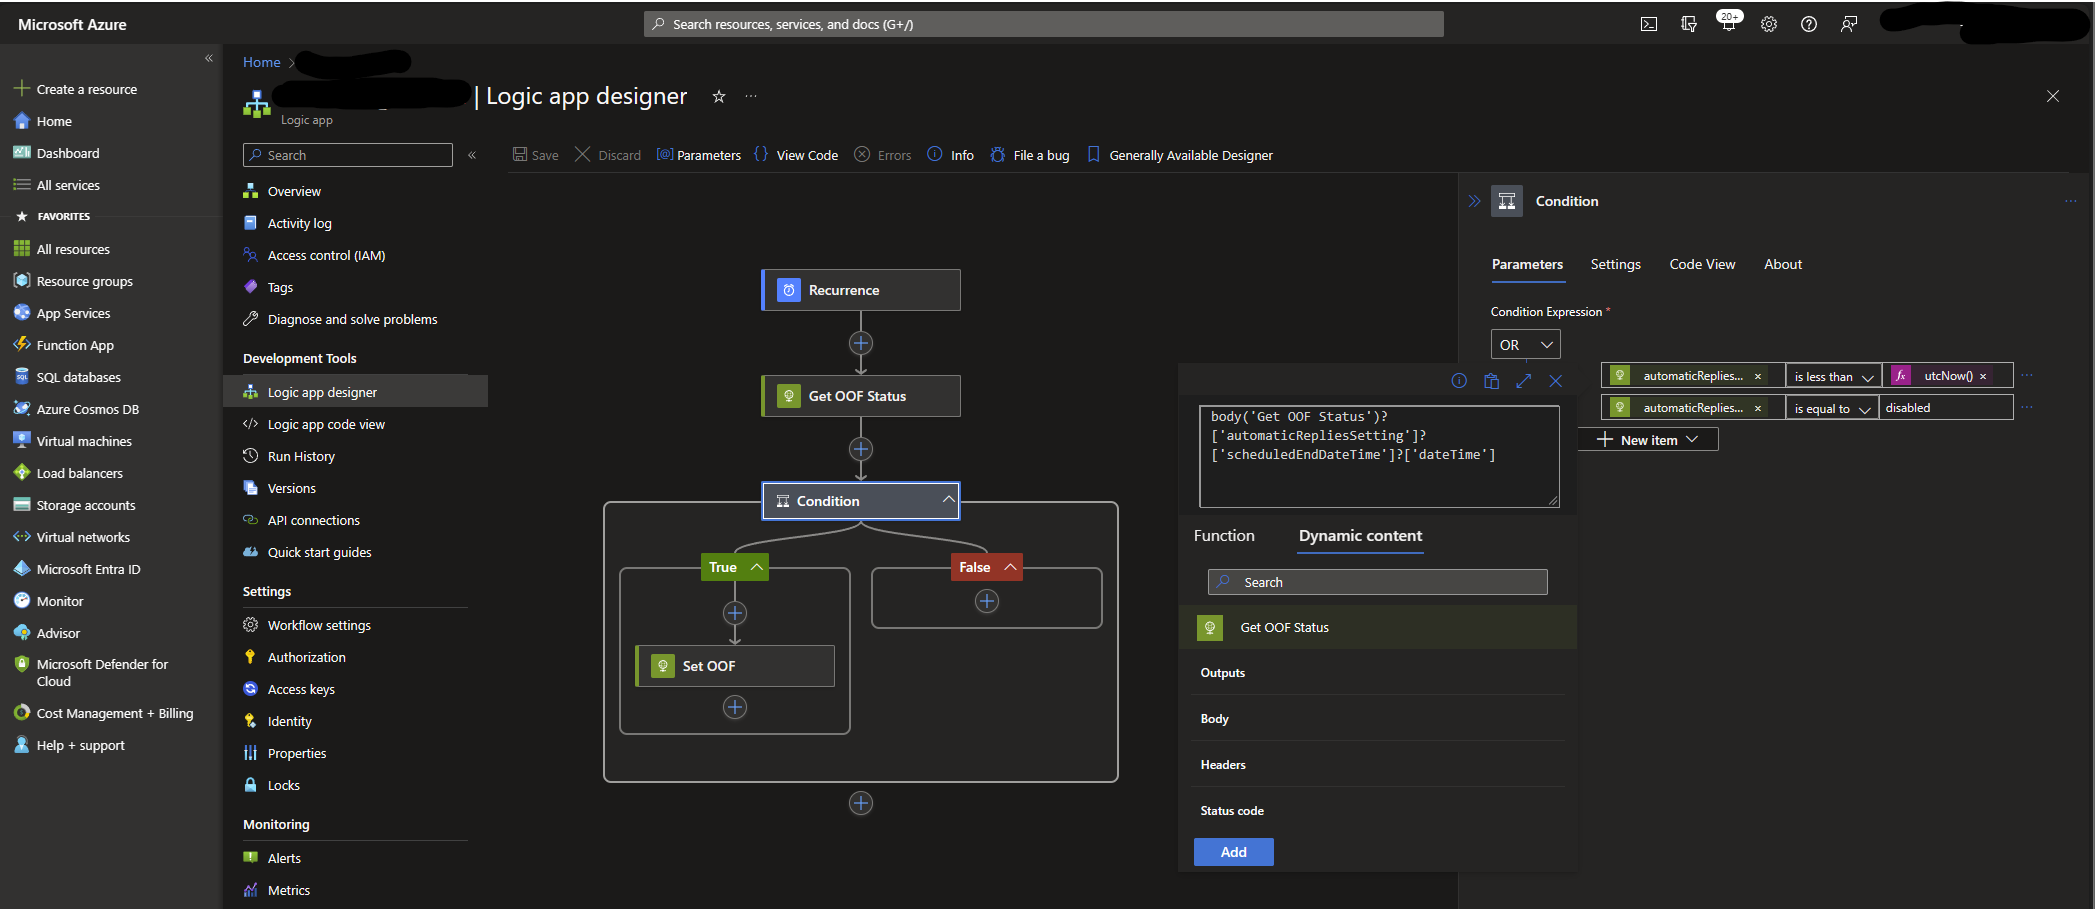
This will ensure that the process is only executed if the out-of-office message is not already set for the user or if the current out-of-office message has expired.
Conclusion
Using Azure Logic Apps for automating out-of-office messages as an admin is an efficient way to manage user settings in Outlook. This approach offers scalability and control, essential for administrators handling users accounts.